






How to Create a Course on Golearnam
Written by
Alvieri Nk
To create a course on Golearnam, you must first be approved to teach in the category your course belongs to.
Golearnam does not allow anyone to publish a course in any category without first going through the tutor application process.
For example, if you want to teach a course about importing products from China, you need to be approved for the category that the course falls under.
Once you have been approved, you can create courses under that category.
Plan your course before you create it
You do not need to have everything perfect before you start.
But you should have a simple plan.
Before opening the course creator, write down:
- What the course will teach
- Who the course is for
- What students should know or be able to do when they finish
- How many installments the course will have
- What each installment will teach
- How many lessons will be inside each installment
- What type of lesson each one will be
- The price of each installment
This makes creating the course much easier.
For our example, we already know what we want to teach.
Course
How to Import Products from China Using Alibaba
Installment 1
Finding Products and Suppliers on Alibaba
Price: 5,000 XAF
Lessons:
How Alibaba Works
How to Find the Right Product
Supplier Checklist
Installment 2
Ordering, Payment and Shipping
Price: 7,500 XAF
Lessons:
Talking to a Supplier and Placing Your Order
Payment and Shipping
Live Questions and Order Review
We now have a simple plan before creating anything on Golearnam.
Understand how courses work on Golearnam
Courses on Golearnam are structured a little differently from courses on many other platforms.
The structure is:
Course → Installments → Lessons
A course has one or more installments.
Each installment has its own lessons.
A lesson belongs to an installment
For example:
How to Import Products from China Using Alibaba
contains:
Installment 1: Finding Products and Suppliers on Alibaba
and
Installment 2: Ordering, Payment and Shipping
Each of those installments then contains its own lessons.
Students get access to the lessons inside the installment they have access to.
Your course does not need many installments
Do not add installments just because Golearnam allows them.
Organize the course in the way that makes the most sense for your students.
A small course can have only one installment.
A larger course can have two, three, four or more.
Think about what the student needs to learn and divide the course in a way that is easy to follow.
Each installment has its own price
This is another important part of how Golearnam works.
For our example:
Installment 1 costs 5,000 XAF.
Installment 2 costs 7,500 XAF.
So the total course price is:
5,000 XAF + 7,500 XAF = 12,500 XAF
The sum of all your installment prices gives the total price of your course.
This makes it possible for a student to start with part of a course instead of having to pay for the whole course at once.
They can continue with another installment when they are ready.
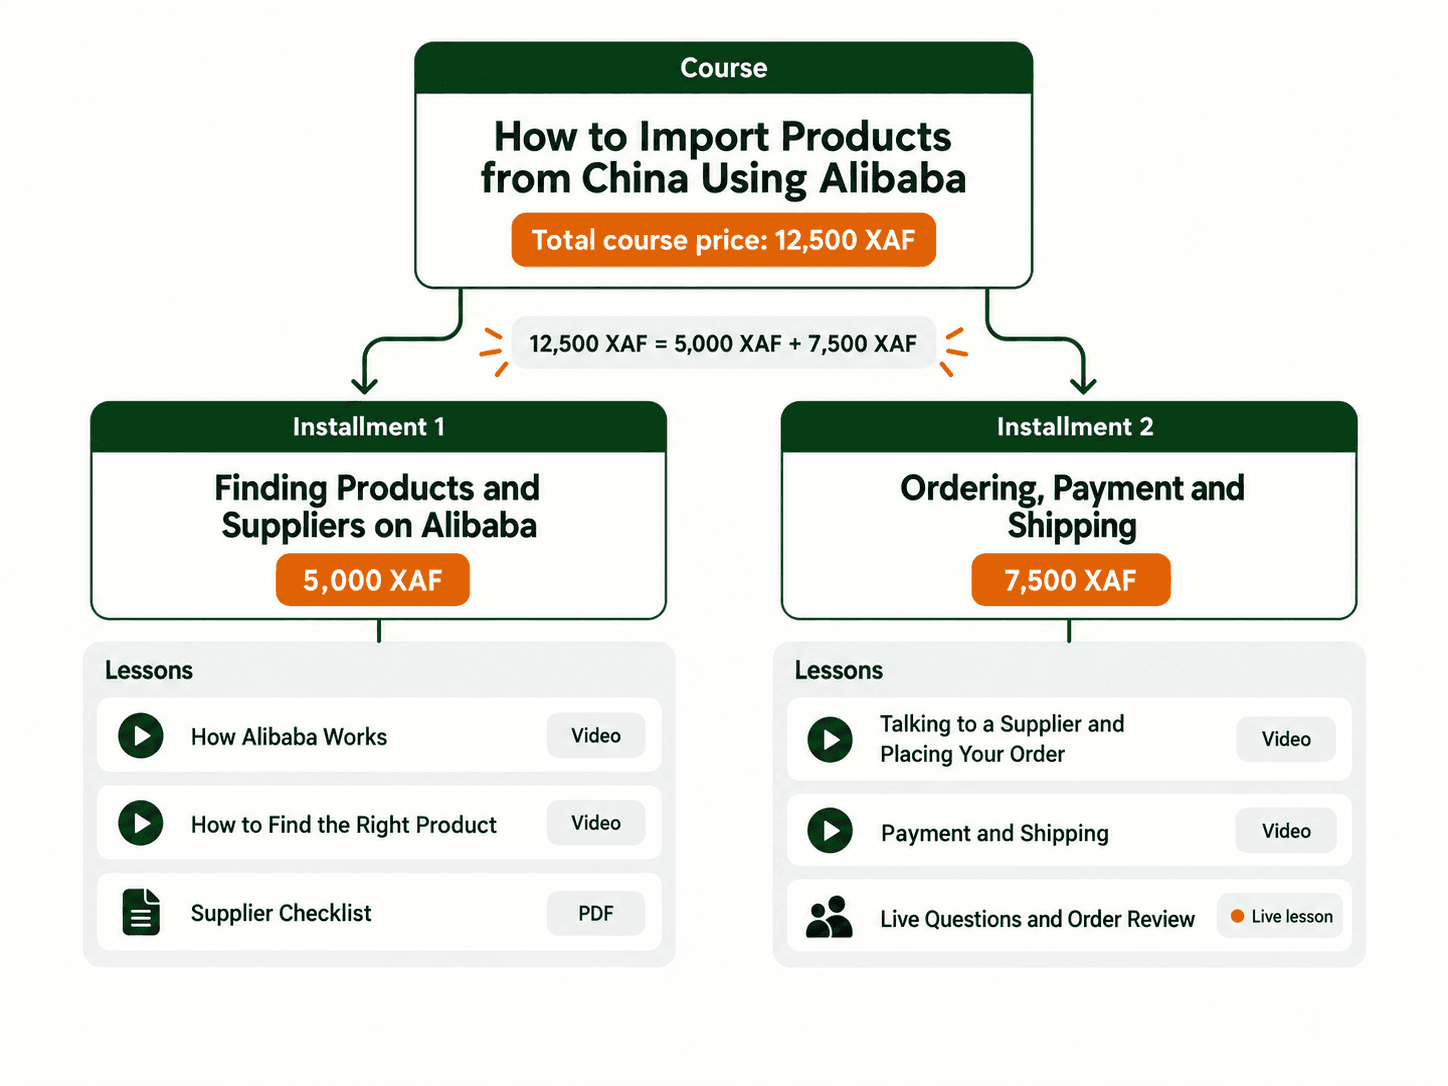
Golearnam course structure
1. Create your course
Now that the course is planned, you can start creating it on Golearnam.
Sign in to your account and open your Tutor Dashboard.
Go to your courses and choose the option to create a new course.
You will be asked to choose the category for the course.
Only categories you have been approved to teach in should be used.
Choose the category that best fits your course and continue.
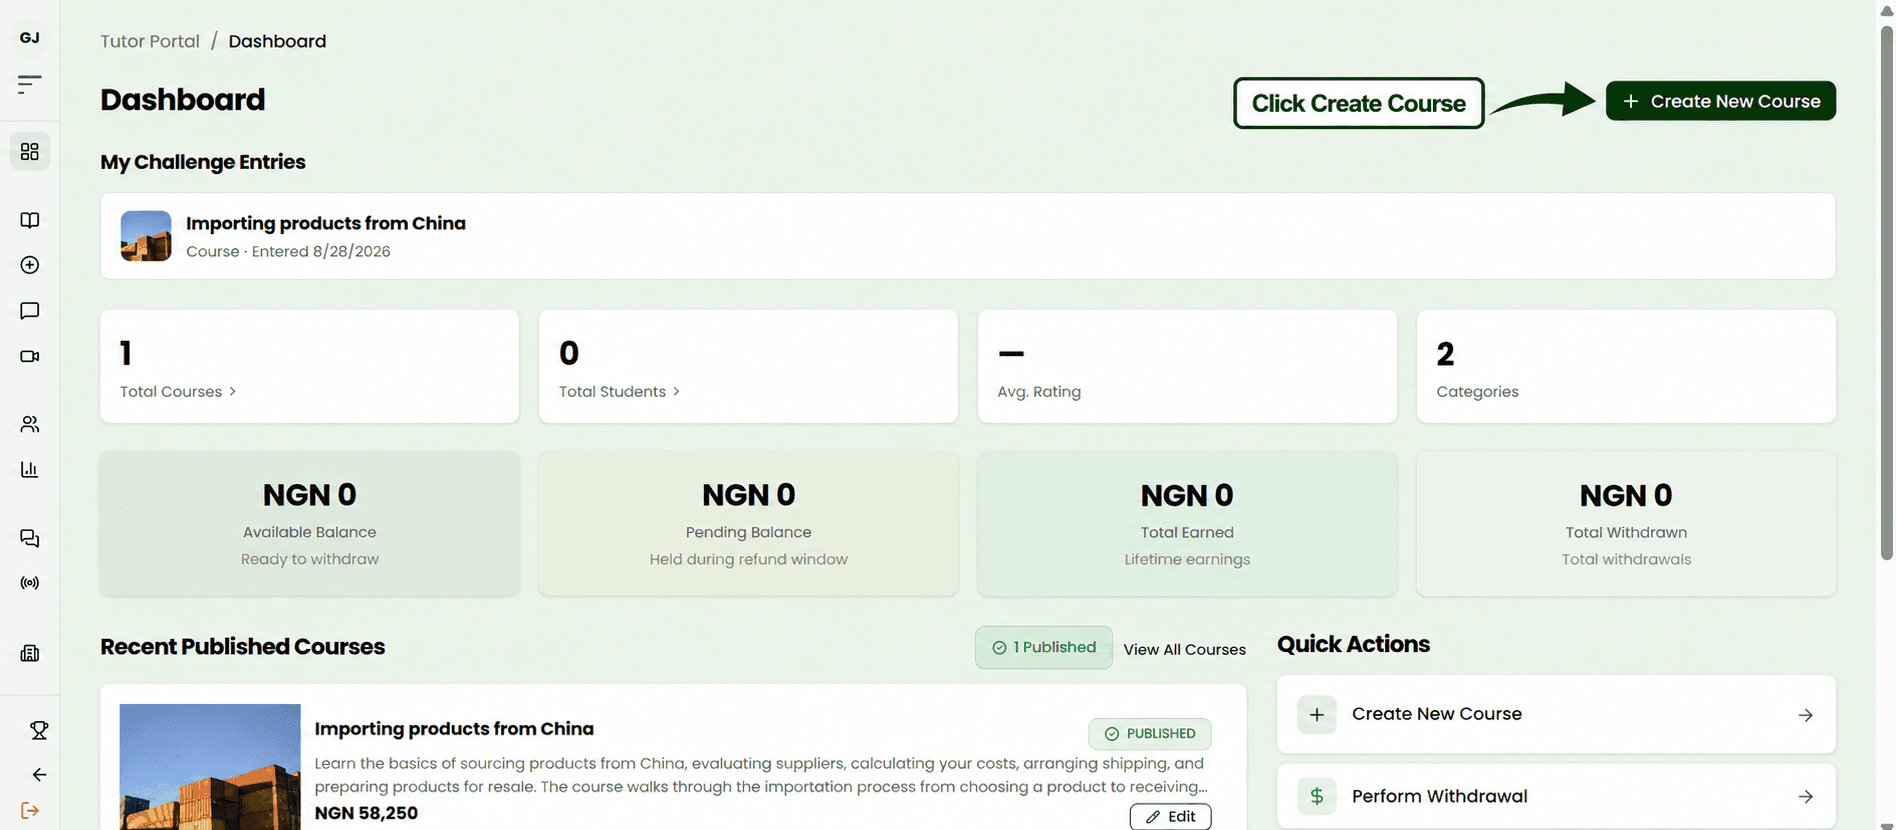
Create course image on Golearnam
2. Add your course information
Next, add the main information students will see when they find your course.
Take your time here. A student should be able to quickly understand what the course teaches.
For our example, we can use the following information.
Course title
How to Import Products from China Using Alibaba
Keep your title clear.
A student should understand what the course is about just by reading it.
Avoid titles that sound impressive but do not explain what the student will learn.
Short description
Learn how to find products and trusted suppliers on Alibaba, place your order and ship your goods from China to your country.
Your short description should give someone a quick idea of what they will learn.
Click on Create Course. This will create the course in Draft mode
About this course
You can add more information in the About This Course section.
For our example:
Want to start importing products from China but don't know where to begin?
This course will show you how to use Alibaba to find products, check suppliers, place an order and arrange shipping.
You will also learn some common mistakes to avoid when dealing with suppliers for the first time.
By the end of the course, you should understand the steps involved in importing a product from China using Alibaba.
Do not make this section difficult to read.
Tell the student:
- What the course teaches
- What they will be able to do
- What problem the course helps them solve
That is enough.
When you are done with this section, Click on Save & Continue.
Add a course thumbnail
Add a clear image that represents your course.
The image should still be easy to understand when it appears as a small course card.
Avoid putting too much text on it.
For this course, the thumbnail could use a simple Alibaba/importing idea such as a package, shipping box or product sourcing illustration.
Prerequisites
Prerequisites are optional.
Only add them if the student needs something before starting the course.
For our example:
- A phone or computer with internet access
- An Alibaba account
- Basic knowledge of using the internet
If your course does not need any special knowledge or tools, you can leave this section empty.
Tags
Tags are also optional.
They can help describe the topics covered by your course.
For our example:
- Alibaba
- Import from China
- China importation
- Import business
- Online business
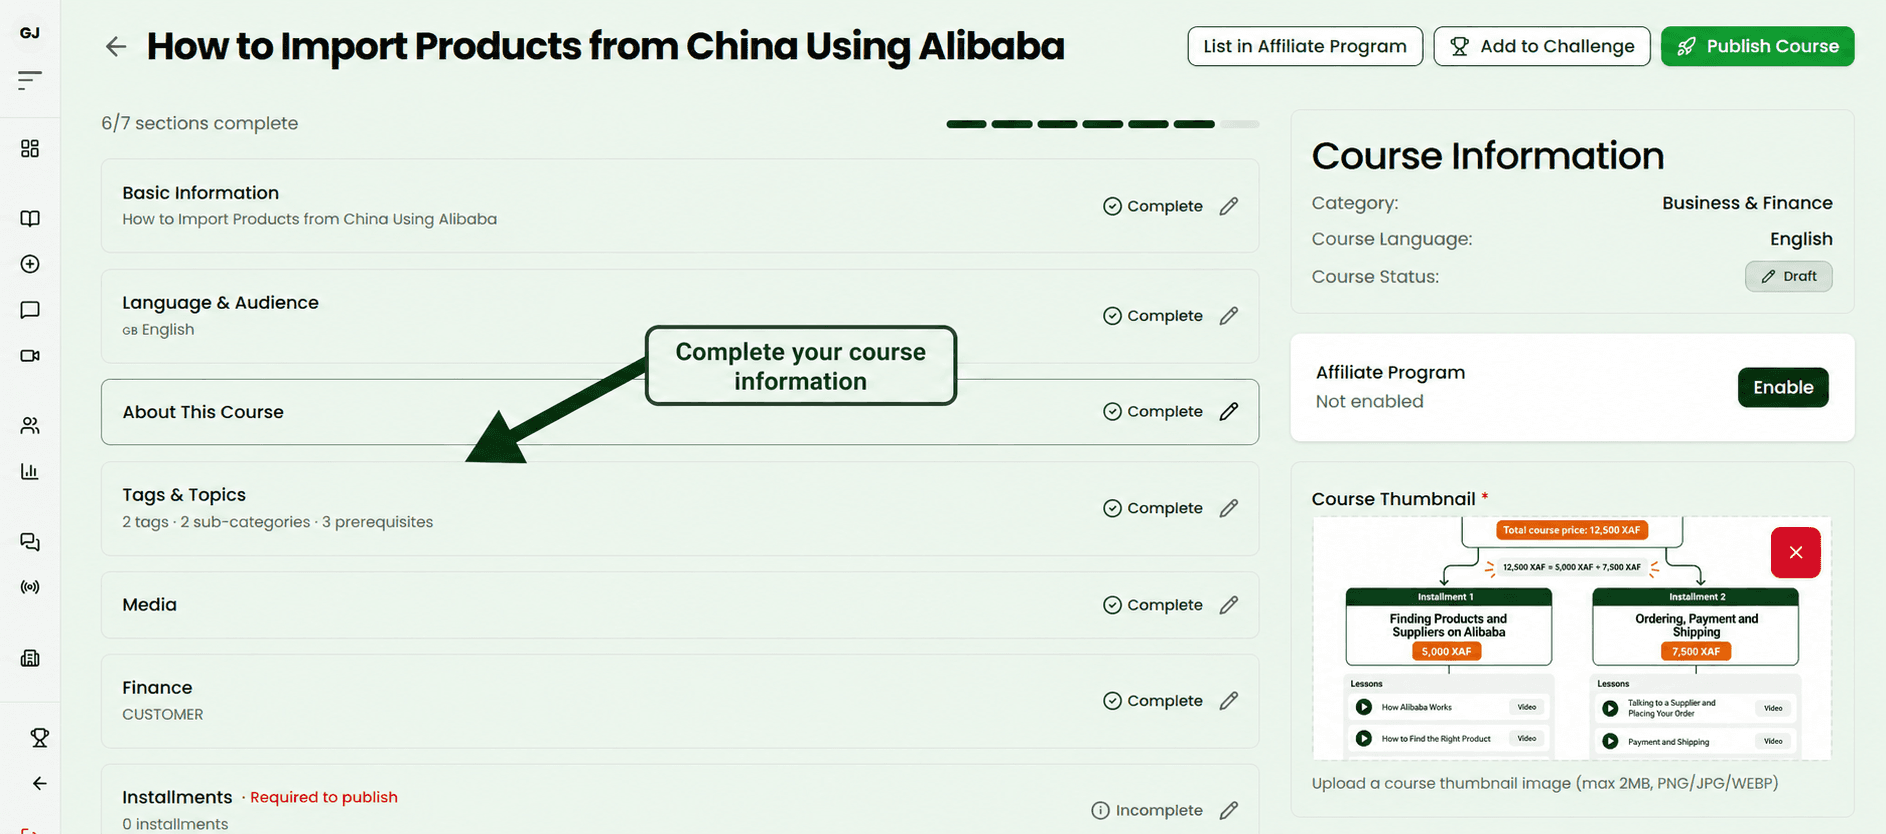
3. Create your installments
Now you can divide the course into installments.
Think of an installment as a part of the course that contains its own lessons.
Scroll down to the Installments section on the course edit page and click on it.
If this is your first installment, click Add Your First Installment.
Enter the installment title, a short description and the price.
For our example, we will create two installments.
Installment 1
Title:
Finding Products and Suppliers on Alibaba
Description:
Learn how to search for products, compare suppliers and know what to check before contacting a supplier.
Price:
5,000 XAF
Installment 2
Title:
Ordering, Payment and Shipping
Description:
Learn what to do after finding a supplier, from discussing your order to payment and getting your goods shipped.
Price:
7,500 XAF.
You can enter the installment price in any currency supported by Golearnam.
Golearnam chooses a default currency for your account based on your location when you register. If you want to use another supported currency, click the currency dropdown on the right side of the price field.
Students do not have to see the price in the same currency you entered. Golearnam can display the price in the currency available for the student's country.
Once both installments are created, the total price of our course is:
5,000 XAF + 7,500 XAF = 12,500 XAF
Once both installments are created, the total price of the course will be 12,500 XAF.
Scroll down to the Installments section and click on it. Ones you are in, Click on Add Your First Installment.
Choose your installment prices carefully
You decide how much each installment costs.
Think about:
- What the student gets in that installment
- How much value it provides
- How easy it is for your target students to pay for it
- The total price of the complete course
Do not divide a course into many small installments if that makes it harder for students to understand.
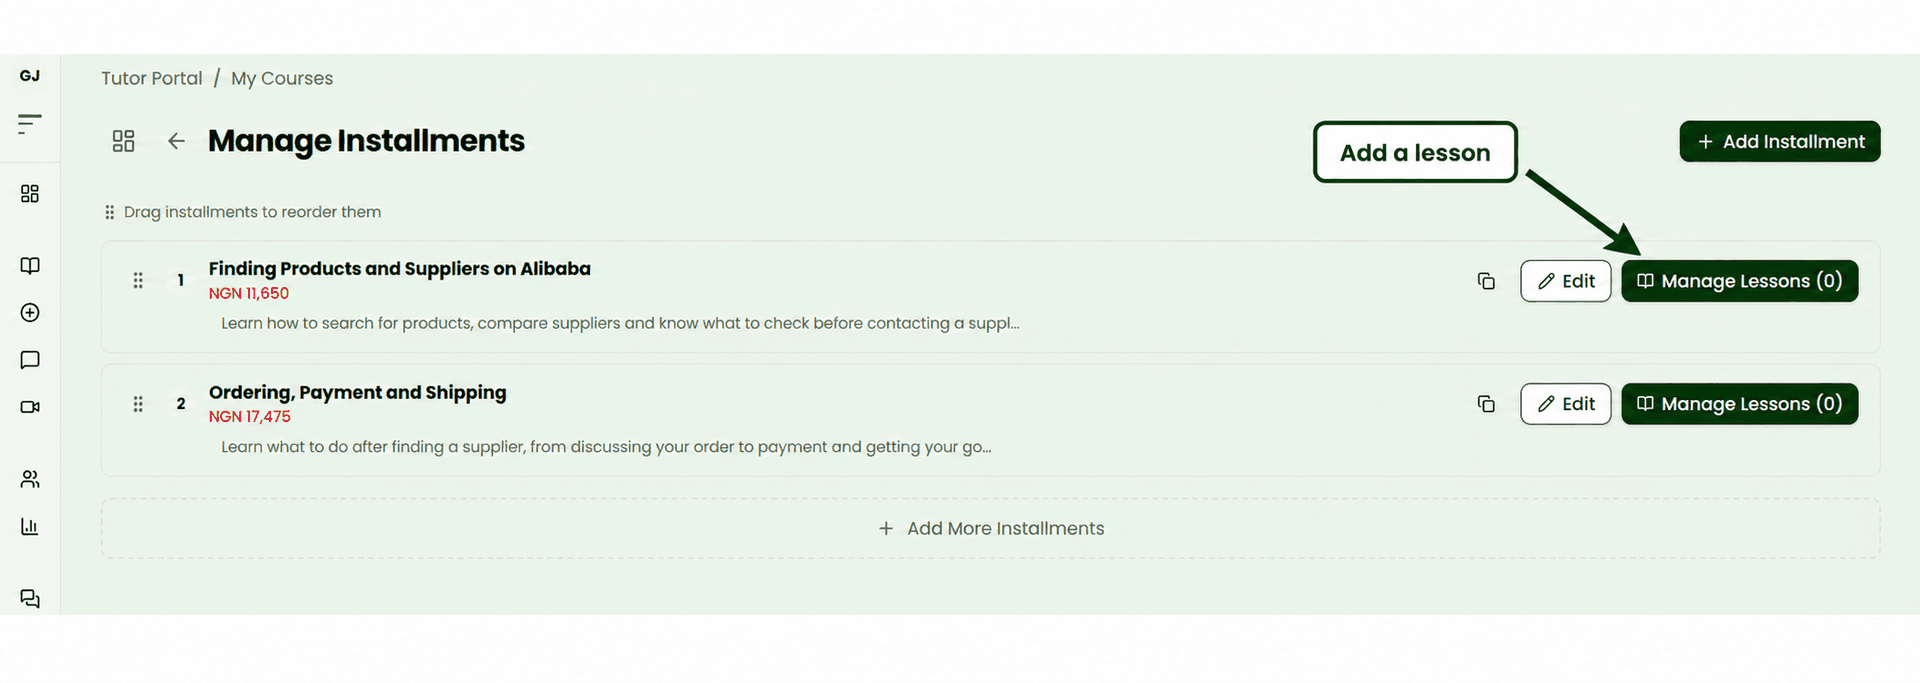
free installment
You can choose to make an installment free if it makes sense for your course.
A free installment can help a student get started before paying for another part of the course.
There are currently some limits on content hosted inside a free installment.
For example, uploaded video and PDF lessons are not available for free installments.
Keep this in mind when planning what you want to give away for free.
4. Add lessons to each installment
After creating an installment, add the lessons the student should receive inside it by clicking on Manage Lessons:
Lessons can be created using different lesson types, including:
- Video lessons
- PDF lessons
- Live lessons
Choose the lesson type that makes the most sense for what you are teaching.
You do not have to make every lesson a video.
Sometimes a short PDF is better.
Sometimes students need a live lesson where they can ask questions.
Use what helps the student learn.
Lessons for Installment 1
How Alibaba Works
Type: Video
Description:
Understand the basic parts of Alibaba and how buyers find products and suppliers.
How to Find the Right Product
Type: Video
Description:
Learn how to search for products, compare options and avoid choosing a product too quickly.
Supplier Checklist
Scroll down and click on Add Lesson to add another lesson or just click on save if you want only 1 lesson for this installment
Type: PDF
Description:
A simple checklist you can use when checking a supplier before placing an order.
When you are done with the lessons for the first installment, click on save or if you added more than one lesson, scroll to the bottom and click on Create Lessons
Lessons for Installment 2
Same pattern as installment 1:
Talking to a Supplier and Placing Your Order
Type: Video
Description:
Learn what information to ask for and what to confirm before paying for your order.
Payment and Shipping
Type: Video
Description:
Understand the basic payment and shipping steps after agreeing on an order with your supplier.
Live Questions and Order Review
Type: Live lesson
Description:
Join a live session to ask questions and go through examples before placing your own order.
Arrange your lessons in a useful order
Think about what the student needs to know first.
Do not arrange lessons randomly.
For example, it makes more sense to teach a student how to check a supplier before teaching them how to pay that supplier.
Each lesson should prepare them for what comes next.
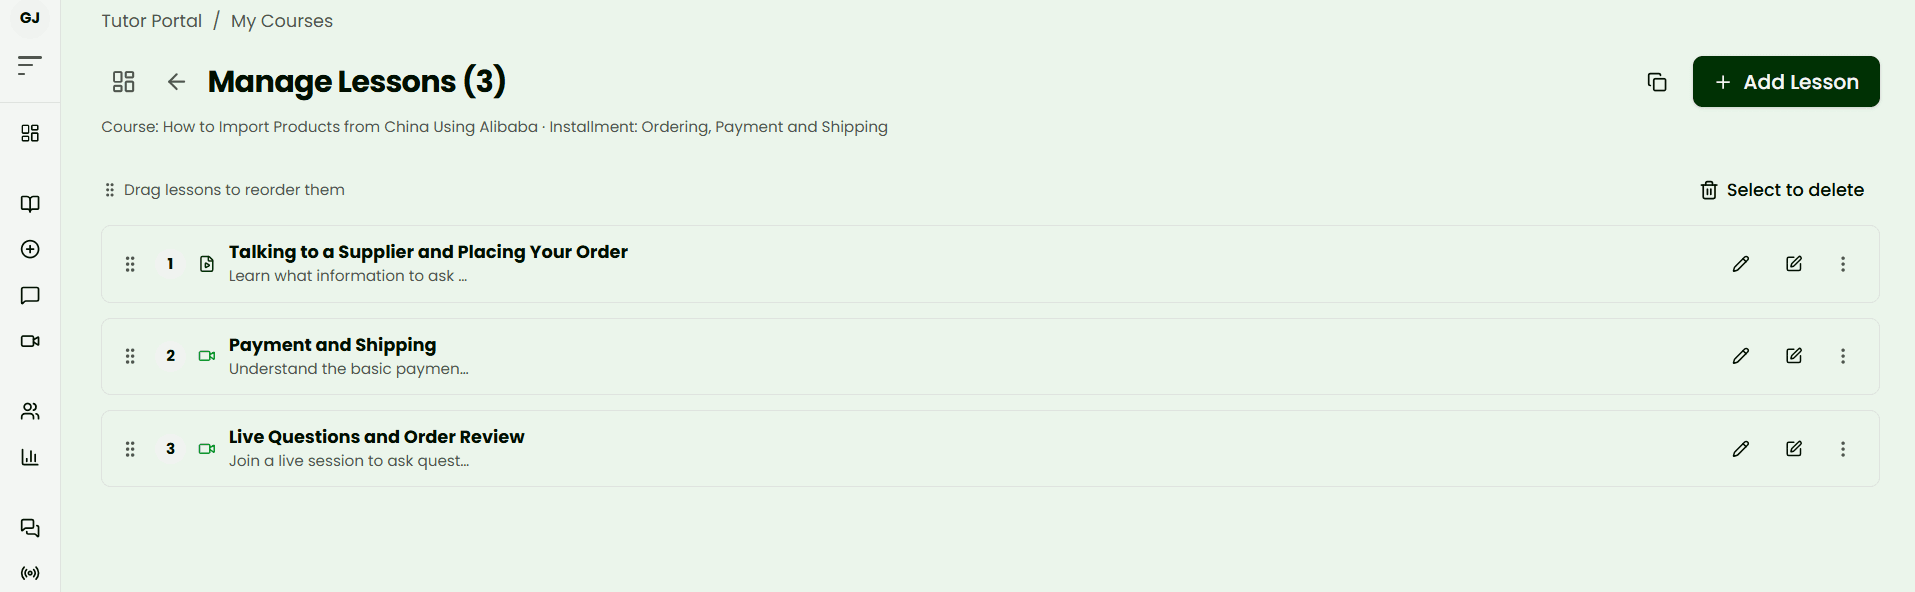
Installment lessons
5. Add a quiz after a lesson (optional)
A quiz is optional, but it is a useful way to check if your students understood what they just learned.
It can also give the student a small sense of progress before they move on to the next lesson.
You can add a quiz to a lesson after creating it.
From the Manage Lessons page, find the lesson you want to add a quiz to.
Click the three-dot menu on the right side of the lesson.
Then click Add Quiz.
Manage Lessons → three dots → Add Quiz → fill the quiz → Create Quiz.
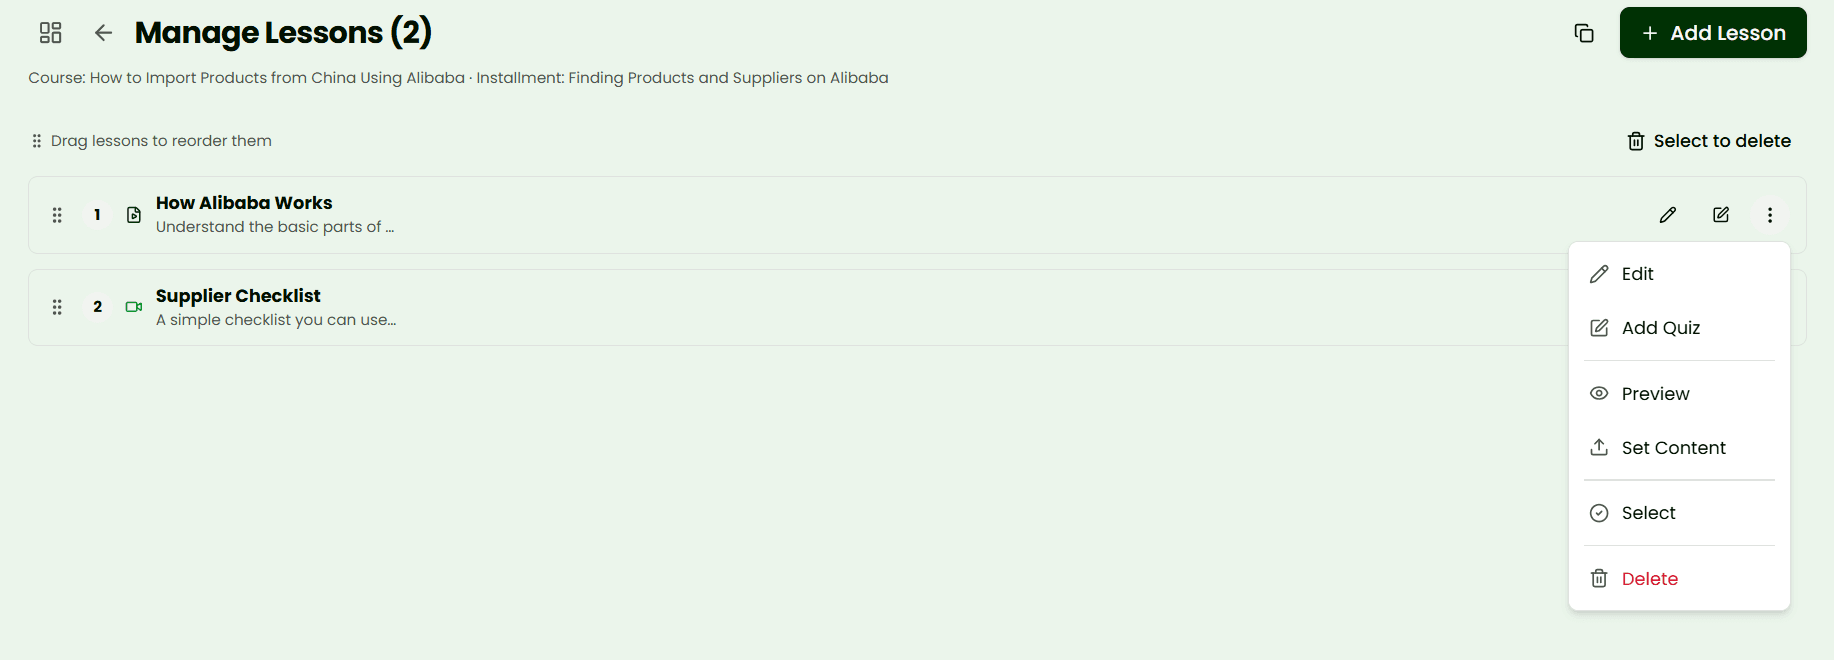
Click Add Quiz
After clicking Add Quiz, enter a title and short description for the quiz.
For our How Alibaba Works lesson, we could use:
Quiz title:
Alibaba Basics
Description:
Answer these questions to check what you learned about using Alibaba.
Then add your questions.
Golearnam lets you choose the type of question you want to ask.
Multiple Choice
The student chooses the correct answer from the options you provide.
For example:
Question:
What should you check before placing an order with a supplier?
Options:
- The supplier's information and product details
- Only the product colour
- The number of social media followers they have
- Nothing, just place the order
Correct answer:
The supplier's information and product details
Fill in the Blank
You can also create a question where the student fills in the missing answer.
Use the question type that makes the most sense for what you want to test.
You do not need to add a quiz after every lesson.
Add quizzes where they will actually help the student remember or check what they have learned.
When you are done adding the questions, click Create Quiz.
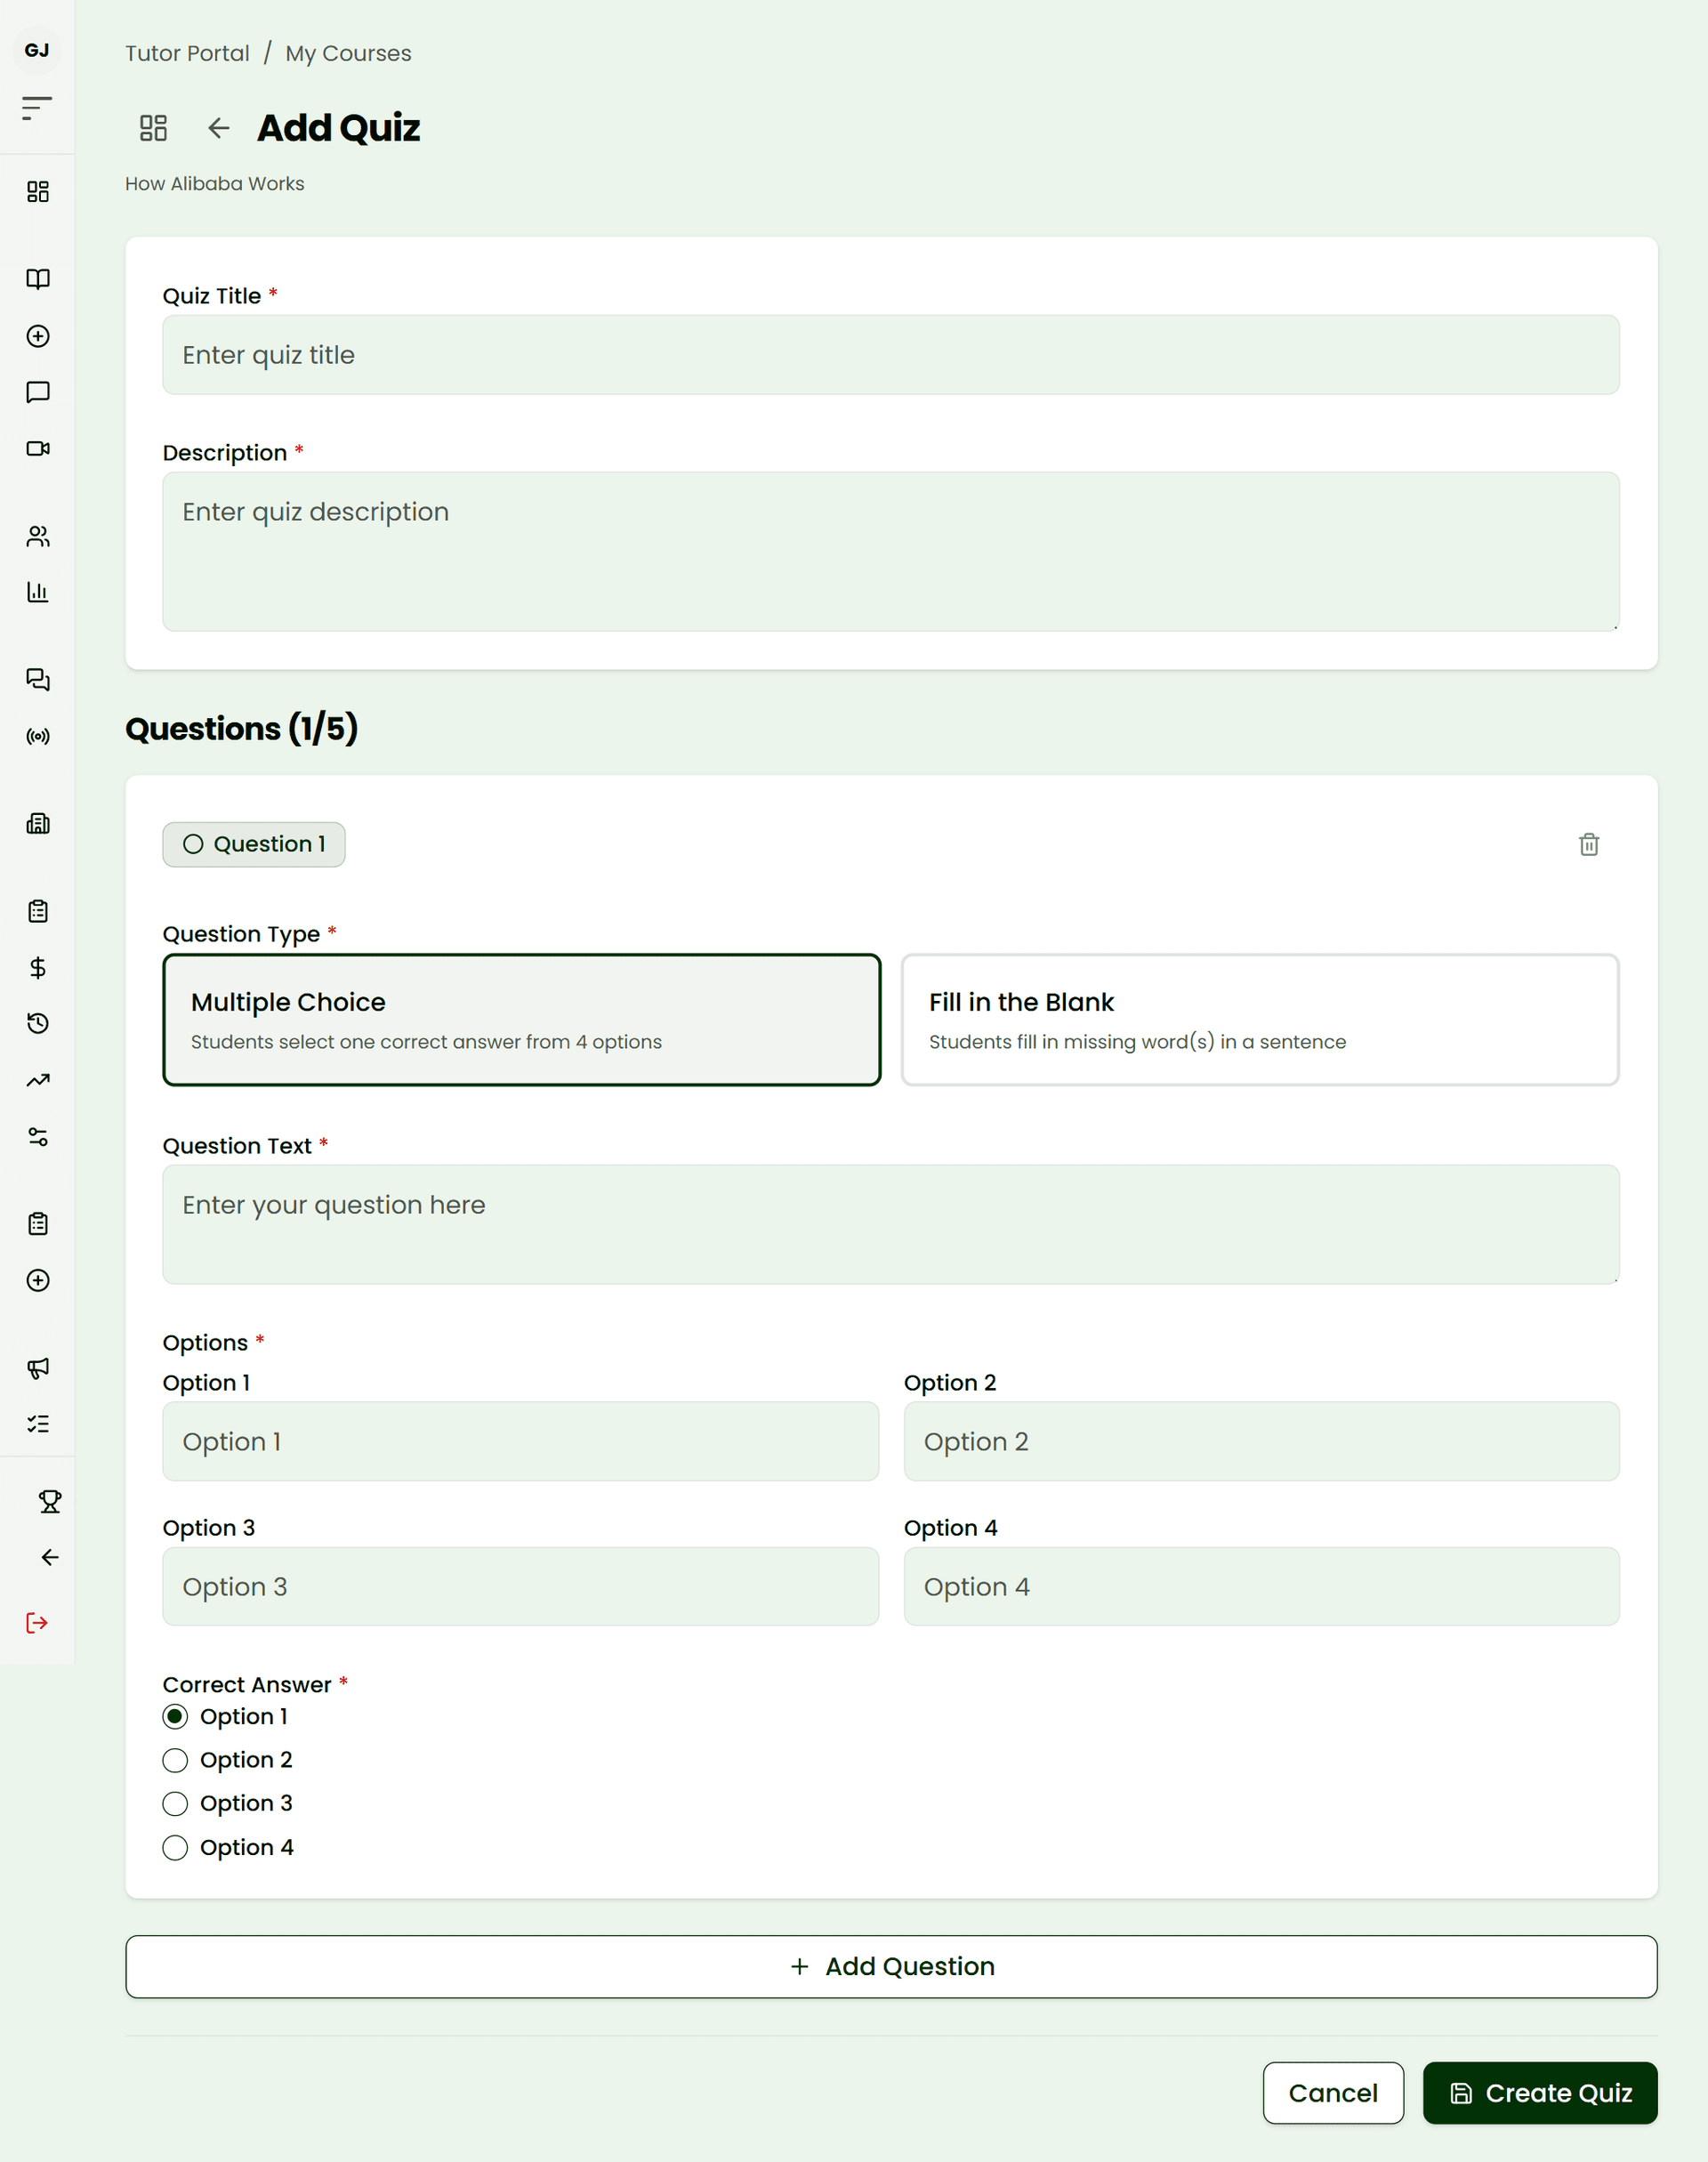
Create your quiz when you are done
6. Choose who pays the processing fee
Once you have finished adding your installments and lessons, go back to the main course edit page: course edit page → Finance → click it → choose who pays
Scroll down to the Finance section and click on it.
Here, you can choose who pays the payment processing fee when a student buys an installment.
There are three options.
Buyer
The buyer pays the processing fee.
This is the default option.
The processing charge is added to what the buyer pays instead of coming from your side.
You
You can choose to pay the processing fee yourself.
In this case, the fee comes from your earnings.
50/50
You and the buyer can also share the processing fee equally.
Half is paid by the buyer and half comes from your side.
There is no single option that is right for every course.
Choose what works best for you and your students.
You can also use the Golearnam Earnings Calculator to see how your price and processing fee choice affect your earnings.
LINK: Golearnam Earnings Calculator
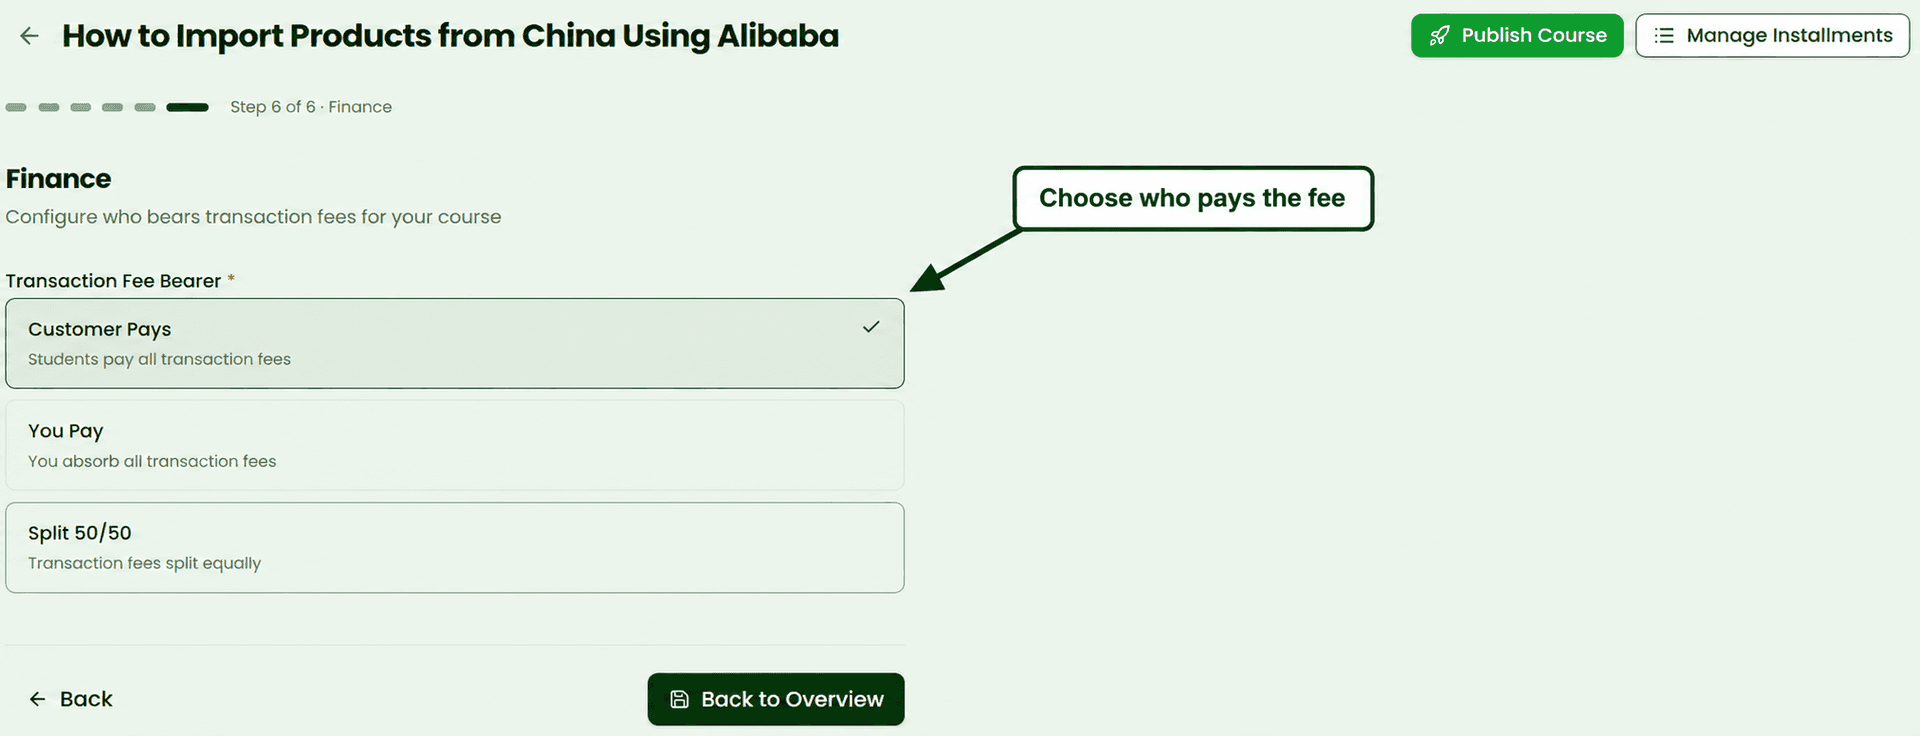
Choose who bears the processing fee
6. Check your course before publishing
Before publishing, go through the course one more time.
Check:
- Is the title easy to understand?
- Does the description explain what the course teaches?
- Is the thumbnail clear?
- Are the installments in the right order?
- Does every installment have the correct price?
- Are lessons inside the correct installments?
- Are the lessons in the right order?
- Are your videos, PDFs and live lessons set up correctly?
- Did you choose who pays the processing fee?
- Is there anything a student could find confusing?
It is better to find a mistake now than after students start taking the course.
7. Publish your course
Once everything looks right, publish your course.
After publishing, your course can be available to learners on Golearnam.
Golearnam displays courses on the platform and can recommend them to learners who are looking for something to learn.
You can also copy your course link and share it with your own audience on places like WhatsApp, Facebook, Instagram, TikTok, YouTube or your website.
You do not have to wait until you have a large audience before creating a course.
Start with something useful, make it easy for students to understand and improve it as you get feedback.
Related Articles

Hosting Your First Webinar on GoLearnAm: A Practical Guide for Tutors
Live sessions create the deepest connections between tutors and students. Here's everything you need to know to host a memorable and impactful webinar on GoLearnAm.

How to Sell Your First Educational Product on GoStore
A step-by-step walkthrough for first-time sellers — from creating your account to publishing your first listing and making your first sale.